PrinterLogic is the IT@Cornell supported platform which allows users to access and manage printers easily.
Note: At this time, a user can only be in one "department's" PrinterLogic queue at a time.
To use the service on “Managed” devices, review the section for your Operating System below.
If your device is non-managed, see the Non-Managed section below.
Once installed, you can reference the Adding Printers section to install a printer.
Windows Devices
- Navigate to “Software Center” by typing “Software Center” in the Windows Search.
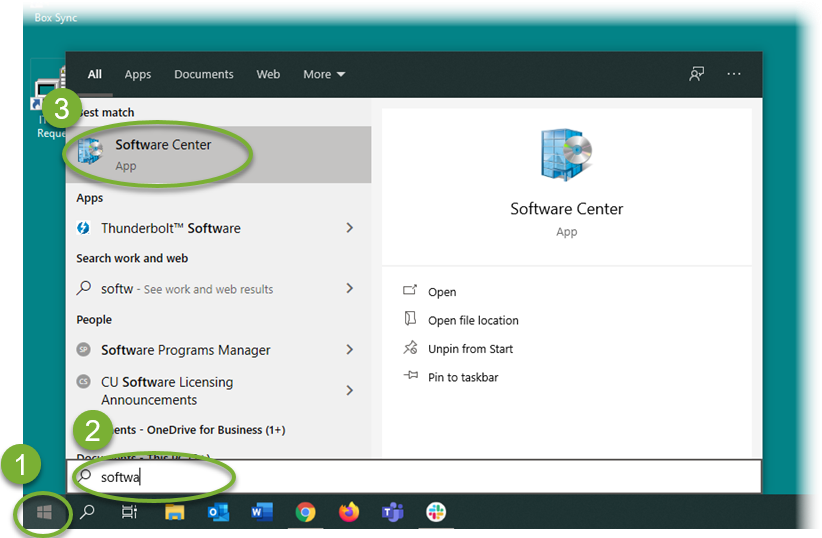
Note: If you do not have "Software Center" on your device, see the Non-Managed device section below.
- Click “Open” or double-click to access the program. It should look similar to the below image when opening.

- We are looking for an application named “PrinterLogic” with a purple colored logo of a printer.
- If you are in the NEW CIS building to select the “CIS – PrinterLogic” application.
Note: When searching you may see, "EN - Printer Logic" which is not to be used at the Ithaca campus for this setup.
- Click the purple logo titled, “CIS – PrinterLogic”. Afterwards, you should have the ability to install the application by clicking “Install”.
- Once completed you should see the status message change to “Installed”. Along with a new icon in the system tray.
- Right-clicking this icon will show a context menu with options to configure printers to your needs including adding new printers.

- For more information, see: https://it.cornell.edu/printerlogic/add-printer-windows
MacOS Devices
- Open the “Self Service” application on your managed Mac.
Note: If you do not have "Self Service" on your device, see the Non-Managed device section below.
- Please navigate to the “Home” page in the Self Service application.
- Select the “Printers” category from the Home tab.

- Left-click the purple PrinterLogic shortcut named, “PrinterLogic Client and Extension”.

- Select “Install” after reviewing the notes related to the install.
- Please wait until the program finishes installing
- After the install is complete you should notice a new icon in the top right hand corner of menu bar.

- Once you see this logo, this means PrinterLogic has been installed and configured to work with your machine.
- Verify Adding Printers Works Properly: In order to allow for easier installation of new printers:
- Open Safari and go to settings.
- In the Safari settings, verify under the “Extensions” tab that the PrinterLogic Extension is enabled.
- See Adding Printers below.
The first step is to install the Printer Logic Extension:
- Navigate to https://coecistech.printercloud.com in your browser of choice. You should see something similar to the below after opening the link.
Note: PrinterLogic is supported on Chrome, Edge, and Safari

- Please select “Install” on the prompt.
- This will open a new browser window to the Vasion Print Extension Installation page which should look similar to the below.

- On this page there are three options for different web browsers.
- Microsoft Edge
- Google Chrome
- All other browsers
- Select the option for the current browser you are using (Edge, Chrome, or Other).
- Your browser will open to its web store to install the extension.
- It may ask you to confirm the install of the extension like below. Confirm/Click to start the the installation.
- Once done, in the “Extensions” menu, you will see “PrinterLogic Extension” listed.
The second step is to setup the Printer Logic Client on your computer:
- Navigate to https://coecistech.printercloud.com in your browser of choice.
- If the client is not installed you may see the following prompt.

- Select “Install” if you are on a Windows machine; on macOS it is important to select the proper installer for your machine (you can check your system using the help here).
- After selecting this will start downloading the client installer to the computer.
- Once the file has finished downloading you will want to open the application and leave everything as it’s default values.
- Click “Next”, “Install”, “Accept”, “Continue”, and “Finish” as appropriate through the installation wizard.
- You can verify the instillation by opening the system tray on Windows or by looking at the toolbar on MacOS which should now contain a small icon of a printer with a plus sign.

The third step is to obtain and enter a PrinterLogic key.
- Submit a IT Support ticket requesting a PrinterLogic code.
- Once you have the PrinterLogic code, click on the Printer Logic icon in your System Tray or Menu Bar (shown above). It will take you to the PrinterLogic portal once more with a new prompt.

- Please select “Current User”. Afterwards, you will receive a prompt for an authorization code.
- Enter the code you received in response to your ticket.
Adding Printers
There are two ways to add printers on PrinterLogic.
Option 1: Click the below link for the printer of your choice below on a PrinterLogic enabled computer.
| North Wing Printers | Link |
| cis-bldg-N279A-T6525 | https://coecistech.printercloud.com/150-839-757/ |
| cis-bldg-N379A-T6525 | https://coecistech.printercloud.com/134-062-541/ |
| cis-bldg-N479A-T6525 | https://coecistech.printercloud.com/142-451-149/ |
| South Wing Printers | Link |
| cis-bldg-N315A-T6525 | https://coecistech.printercloud.com/133-013-997/ |
| cis-bldg-N415A-KC364 | https://coecistech.printercloud.com/141-402-605/ |
- After clicking the portal link will look similar to the below snapshot, showing folders for each subgroup of printers.

-
- From here, you can expand the folder tree structure for your areas printers to show a list of available devices.
- Simply, click on the desired printer’s name.
- This should open a dialog box asking if you want to install the printer, with a checkbox to let you set it as your default.